This tutorial is intended to guide you on how to properly set up the built-in Japanese safety systems ATS-SN and ATS-P in the case you want to make your route ready to use them. This page assumes that you are familiar with what ATS-SN and ATS-P are. If not, please take a look at the following page first:
➟ How to drive - A quick overview on controls, ATS/ATC, signals and signs
■ Setting up a route for ATS-SN
For ATS-S, an S-type transponder is usually placed 600 meters in front of a red signal. The distance can of course vary with the operation speed used on the route, but is a good start for speeds up to 100 km/h. For ATS-SN, the SN-transponder is additionally placed around 20 meters in front of the signal.
● When the signal interval is larger than 600 meters

In the case that your signals are at least 600 meters apart from each other, the setup is quite easy. Place a Track.Tr 0 command around 600 meters in front of any signal, and a Track.Tr 1 command around 20 meters in front of any signal:
| ▶ |
With Track 0200, .Tr 0 0780, .Tr 1 0800, .Signal 3;;-3;-1 |
● When the signal interval is smaller than 600 meters
When signals are in placed smaller intervals, it can become necessary that an S-type transponder is placed in front of one signal, while it actually needs to reference the signal following that one. In this case, it is necessary to indicate which upcoming signal a transponder is supposed to reference. Via a Track.Tr type; 0 command, the immediately following signal is referenced, while via Track.Tr type; 1, the signal following that one is referenced.
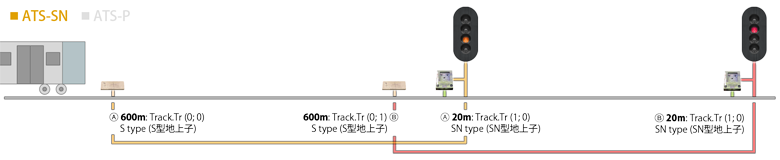
Your code will then need to follow this scheme:
| ▶ |
With Track 0200, .Tr 0 0700, .Tr 0;1 ,; referencing signal B 0780, .Tr 1 0800, .Signal 3;;-3;-1 ,; signal A 1280, .Tr 1 1300, .Signal 3;;-3;-1 ,; signal B |
■ Setting up a route for ATS-P
For ATS-P, the first pattern renewal transponder is usually placed 600 meters in front of each signal, which can also vary with the operation speed. The pattern renewal transponder is usually repeated a few times so that in the case the aspect of the signal changes, the train can be informed about the change without having to apply the brakes for too long. The pattern renewal transponder is usually placed 600 meters, 280 meters, 180 meters, 85 meters or 50 meters in front of signals, while an immediate stop transponder is usually placed either 25 meters or 30 meters in front of each signal. Which transponders are located where usually depends on the type of the signal. The following is only an example.
| Signal | 600m | 280m | 180m | 85m | 50m | 30m | 25m |
|---|---|---|---|---|---|---|---|
| Departure signal | ✓ | ✓ | ✓ | ✓ | ✓ | ✗ | ✓ |
| Block signal | ✓ | ✗ | ✓ | ✓ | ✗ | ✓ | ✗ |
| Home signal | ✓ | ✓ | ✓ | ✓ | ✓ | ✓ | ✗ |
Departure signals are those placed at the end of a station, block signals are signals in-between stations, and home signals are those immediately placed before stations.
● When the signal interval is larger than 600 meters

In the case that your signals are at least 600 meters apart from each other, the setup is quite easy. Place Track.Tr 3 commands around 600 meters, 280 meters, 180 meters, 85 meters and 50 meters, depending on the requirements, in front of any signal, and a Track.Tr 4 command around 25 meters in front of any signal:
| ▶ |
With Track 0200, .Tr 3 ,; 600m 0520, .Tr 3 ,; 280m 0620, .Tr 3 ,; 180m 0715, .Tr 3 ,; 85m 0750, .Tr 3 ,; 50m 0775, .Tr 4 ,; 25m 0800, .Signal 3;;-3;-1 |
● When the signal interval is smaller than 600 meters
When signals are placed in shorter intervals, you need to be a little more careful on how to place the transponders if they need to reference signals following the immediately upcoming one. Whenever you reference signals beyond the immediately upcoming one with pattern renewal transponders or immediate stop transponders, the first signal until then which is red is referenced. This means that if you use Track.Tr type;1, but the immediately upcoming signal is red, that signal will be referenced. Only otherwise, the signal behind that is referenced. Take a look at the following illustration depicting how to set up ATS-P in the case of overlapping signal ranges:
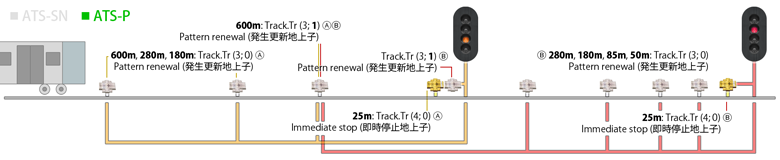
The corresponding code could look something like this:
| ▶ |
0200, .Tr 3 ,; 600m 0520, .Tr 3 ,; 280m 0620, .Tr 3;1 ,; 180m (signal A); 605m (signal B) 0775, .Tr 4 ,; 25m (signal A); 0777, .Tr 3;1 ,; 23m (signal A); 448m (signal B) 0800, .Signal 3;;-3;-1 ,; signal A 0945, .Tr 3 ,; 280m 1045, .Tr 3 ,; 180m 1140, .Tr 3 ,; 85m 1175, .Tr 3 ,; 50m 1200, .Tr 4 ,; 25m 1225, .Signal 3;;-3;-1, ; signal B |
This code is simplified in that you would likely also want to include transponders for signal A at 85m and 50m, which you can do by using additional Track.Tr 3;1 commands.
■ Setting up a route for both ATS-SN and ATS-P
Often, a route equipped with ATS-P additionally employs equipment for ATS-SN, be it for trains not equipped with ATS-P, or as a fallback should ATS-P suffer from a failure. Normally, any of the S-type or SN-type transponders will activate the ATS-SN system, while any of the pattern renewal or immediate stop transponders will activate ATS-P. In order for an ATS-P-equipped train to stay in ATS-P operation all the time, you should set up all ATS-SN-related transponders to not change the current safety system. This can be done via Track.Tr type; signal; -1.

You should make sure that no two transponders occupy the same location. Both the S-type and the pattern renewal transponders are usually placed 600 meters in front of each signal. If you place the pattern renewal transponder first, ATS-P can activate if not already active, and the subsequent S-type transponder will have no effect on a train equipped with ATS-P. Your code will thus need to follow this scheme:
| ▶ |
With Track 0195, .Tr 3 0200, .Tr 0;;-1 0520, .Tr 3 0620, .Tr 3 0715, .Tr 3 0750, .Tr 3 0775, .Tr 4 0780, .Tr 1;;-1 0800, .Signal 3;;-3;-1 |
If the signal distance is shorter than 600 meters, you should additionally employ the techniques described in the respective sections for ATS-SN and ATS-P.
■ Setting up a route for the use of accidental departure transponders
In stations, the accidental departure transponders are occasionally placed shortly after a station stop point to prevent a train from accidentally starting toward a red signal. The accidental departure transponder will trigger regardless of whether the train currently operates in ATS-SN or in ATS-P. As you can define multiple stop points per station, each being associated to a particular number of cars, any accidental departure transponder will only be active if it is behind the stop point at which the train is supposed to stop at.
You can employ the accidental departure transponder in the following way:
| ▶ |
0100, .Sta 0178, .Stop 1;;;4 0180, .Tr 2 0212, .Stop 1;;;6 0214, .Tr 2 0246, .Stop 1;;;8 0248, .Tr 2 0280, .Stop 1;;;10 0282, .Tr 2 0300, .Signal 3;;-3;-1 |
If, in this code example, your train had a length of 8 cars, the transponders at 248 and 282 would bring the train to a hold immediately if the upcoming signal at 300 is red.