This page describes the principles of switches, and running the player train on alternate tracks within the game world.
At present, this is a basic implementation, and has many flaws which are centered around the routefile format, and the need to retain backwards compatability.
Please note that further development is ongoing.
The .Turn command may not be used in routes containing switches. Please use the .Curve command instead.
■ Basic Principles
The CSV route format is a linear format, centered around Rail 0 , which defines the world path of the player.
Alternate rails may be added, but these are positioned relative to the player rail.
Two types of switch are available- The standard switch and a trailing switch.
The current implementation (as of v1.10.0) is basic, and is only intended as an initial working experiment. As such, signalling, speed limits etc. are poorly or not supported when running on secondary tracks.
■ Commands
SecondRail: A non-negative integer representing the second of the two switch rail indicies.
InitialSetting: The initial setting for the switch.
Reserved: Not currently used, reserved for future use.
SwitchName: The name for the switch displayed on the map.
FirstTrackName: The name for the first track when displayed on the map.
SecondTrackName: The name for the second track when displayed on the map.
This creates a standard switch.
If the player train is running in the forwards direction on the rail index defined by FirstRail, it will be switched to the current setting of the switch.
If the player train is running in the reverse direction on the rail index defined by SecondRail, and the current setting of the switch is also SecondRail it will be switched to FirstRail.
SecondRail: A non-negative integer representing the second of the two switch rail indicies.
InitialSetting: The initial setting for the switch.
Reserved: Not currently used, reserved for future use.
SwitchName: The name for the switch displayed on the map.
FirstTrackName: The name for the first track when displayed on the map.
SecondTrackName: The name for the second track when displayed on the map.
This creates a trailing (reverse) switch.
If the player train is running in the reverse direction on the rail index defined by FirstRail, it will be switched to the current setting of the switch.
If the player train is running in the forwards direction on the rail index defined by SecondRail, and the current setting of the switch is also SecondRail it will be switched to FirstRail.
SecondRail: A non-negative integer representing the second rail indicies.
SwitchName: The name for the switch displayed on the map.
This switches the path (rail) that the player train is running on.
If the player train is running in the forwards direction on the rail index defined by FirstRail, it will be switched to SecondRail.
If the player train is running in the reverse direction on the rail index defined by SecondRail, it will be switched to FirstRail.
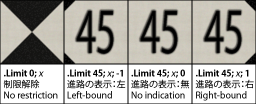
This creates a limit for a rail other than Rail 0.
Speed: A positive floating-point number representing the speed, by default measured in km/h, or 0 to indicate no speed restriction. The default value is 0.
Post: The side on which to place a default Japanese-style speed limit post. The default value is 0.
Cource: The directional indication. The default value is 0.
▸ Options for Post:
0: No post will be placed.
1: The post is placed on the right side of the track.
▸ Options for Cource:
0: The post does not indicate a particular direction.
1: The post applies for a right-bound track.
This command defines the new speed limit from this point on. If the new speed limit is lower than the current speed limit, the new speed limit will take effect immediately. If the speed limit is higher than the current speed limit, the new speed limit will take effect only once the whole train has passed this point. By setting Speed to 0, the speed restriction is released. By setting Post to either -1 or 1, a default Japanese-style speed post is placed at the respective side of the track. Setting Course to either -1 or 1 includes a directional indication, which is usually used at railroad switches to indicate that the speed limit only applies if the respective direction is being taken. If Speed is set to 0, the setting of Course has no effect.
This command places a bumper. The train can collide with the bumper in both the forward and backward directions. Place this command at the beginning and the end of the route. An object is not automatically created, so use Track.FreeObj to create a visual representation of the bumper if necessary.
Value: A non-negative floating-point number representing the accuracy of the track. The default value is 2.
This command sets the accuracy of the track from this point on. Values should be in the range from 0 to 4, where 0 means perfect accuracy (no inaccuracy at all), 1 means very good accuracy (high speed lines), 2 means good accuracy, 3 means mediocre accuracy, and 4 means poor accuracy. Intermediate values are also possible. Currently, values below 0 are clamped at 0, and values above 4 are clamped at 4.
Rate: A non-negative floating-point number measured in percent representing the adhesion of the track. The default value is 100.
This command sets the adhesion of the track from this point on. As a reference, the value of 135 represents dry conditions, 85 represents frost and 50 represents snowy conditions. With a value of 0, the train will not be able to move at all.
FileName: The file name for the sound to play, relative to the Sound folder.
Speed: The reference speed in km/h for speed-dependant sounds, or 0 to play the sound speed-independently. The default value is 0.
This command plays an announcement or other kind of sound in the cab once the player’s train crosses the point where this command is used. If Speed is set to 0 (default), the sound is played as-is. If a Speed is given though, the sound plays at is original pitch at the specified speed, and is pitch-modulated proportionally for other speeds, useful for custom flange sounds, pointwork sounds, etc.
FileName: The file name for the sound to play, relative to the Sound folder.
Speed: The reference speed in km/h for speed-dependant sounds, or 0 to play the sound speed-independently. The default value is 0.
This command plays an announcement or other kind of sound in each car once the player’s train crosses the point where this command is used. If Speed is set to 0 (default), the sound is played as-is. If a Speed is given though, the sound plays at is original pitch at the specified speed, and is pitch-modulated proportionally for other speeds, useful for custom flange sounds, pointwork sounds, etc.